Welcome to the blog

A string of thoughts, DIY, thrift scores, geeking out, sewing, crafting, and so on....

Welcome to the blog

A string of thoughts, DIY, thrift scores, geeking out, sewing, crafting, and so on...

Welcome to the blog

A string of thoughts, DIY, thrift scores, geeking out, sewing, crafting, and so on...

Welcome to the blog

A string of thoughts, DIY, thrift scores, geeking out, sewing, crafting, and so on...

Welcome to the blog

A string of thoughts, DIY, thrift scores, geeking out, sewing, crafting, and so on...

Showing posts with label Decorating. Show all posts

Thursday, March 10, 2011

New Living Room via Craigslist

Our living room  (or "frunchroom" if you're from 'round here) has been quite dark and dungeonous, as I posted before, and as you can see in the pic above. It was the dark furniture and ugly woodwork that made it so. Don't get me wrong, I love the original oak woodwork throughout our 1926 Bungalow, but after years of not much maintenance...or some bad staining...it just looks blah. So we cut to the chase and painted the wood in this room white. Much better!

Anyway, as I've stated this all to my husband, he, so sweetly and secretly, left early yesterday morning to pick up a sweeeeet craigslist find in order to give me what I wanted - something new (as in new to us) and some color! Now I can't say he swindled the sellers because he just paid what they asked, but It was quite an awesome deal at $150 for all 3 pieces - which are in near perfect condition for their age. He got 2 green swivel chairs and one long wool tufted sofa in mauve. Can't get much more colorful than that!

Much better. Yes? We've completely redecorated this room - not by adding much but taking all the crud out like the radio, cabinets and misc junk we don't use or want in there. And we're selling the black vinyl couch in the photo above, if anyone is interested...and in the Chicagoland area. The couch is great for people with grubby handed kids - like us. And it was made in Chicago way back when things were actually made in America.  

Its nice being married to a picker!

Tuesday, November 16, 2010

Decorating with Ebroidered Wall Art


Some people may think of embroidery as "old lady art" to keep fingers and joints nimble. They are so wrong! It's quite a beautiful art form that I am currently enamored with. It does take skill - even when you have a pattern guide. I embroider the faces on my dolls and let me tell ya' it is not simple. It is but it isn't. I love the embroidered wall art especially, at the moment. There are tons of great patterns and embroidery art out there. I recently saw this one above in the pictures of an estate sale. All I saw was this folded on top of a dresser. Even though it was folded, I knew it beheld awesomeness and I told my husband " See that? Go there and get it for me!" And being so kind and doting, he did. Now...where to put it....

So here are a few ones I currently love and would love to possess if possible.

Pretty Girl in Window by luckyjackson

I love this style...very intriguing!

smiths please please please... cross-stitched by chezsucrechez

I love the Smiths so naturally I had to include this even though it is cross-stitch.

Red Fox Vulpes Vulpes Embroidery by Naiomicayne

I love foxes. Nuff said.

 
 Oiseau - bird embroidery by MariaDryden

Ummmmmm...Adorable!The whole shop is adorable actually.

Monday, November 15, 2010

Slightly Transforming the Dining Room.


Since we moved in, we've painted, repaired and are slowly decorating the place. Our dining room looks like a marriage between a viking's lodge with a 19th century apothecary. Not exactly my style but my husband has his ideas...We have a large old ornate dark wood table with mismatched viking-ish chairs, coupled with an Admiral from the 40's that we converted into a display / storage with a former built in cabinet on top.

All the wood is dark and it drains the potential life out of the space. Even with the light form the 3 large windows there is this darkness haunting that room.
SO my bright idea is let's add an accent wall. Something to take the dismal out and a bit of fun in. I looked for wallpaper on Ebay and lo and behold I found some that was perfect - to me anyway. Since I love the color in the room, I wanted to keep that. (we will eventually strike a good balance with the furnishings...one day)

 
I found some Hygge & West Daydream wallpaper for a steal...$40 a roll! That stuff is originally $105 a roll. So I'm pretty proud of myself. My plan is to cover this bland wall that doesn't have much going for it.

I'd like to get this covered and hopefully it will inspire us to change the rest of the decor in this room. Hopefully.

Sunday, August 29, 2010

Our Kitchen Remod-ish

Kitchen as it was when we moved in
Upon moving in, we didnt exactly LOVE our kitchen. The cabinets are solid maple but the previous owner decided that wasn't good enough and decided a few colors of brown sponge painted on them was the best idea. Here is a better look:

Well, its not the greatest photo, but you can see the paint and the awful gold hardware in which the gold is wearing off.


So, first we painted the walls green and removed all the cabinet doors
the huddled mass of mess consisting of drawers and doors
 So we obviously can't afford a brand new la-de-da kitchen with all the bells and whistles, so what's there to do? PAINT! We'll see how long this process takes. Its been w/out cabinet doors for quite a few weeks now. Any help is never turned away!
{hint, hint}

Monday, August 23, 2010

Eames {Style} Rocker; You are SO mine!


I've been coveting one of these chairs for way too long to admit. They are perfect for rocking babies to sleep..and toddlers too. As of yet, they've been too expensive for my frugal nature. Plus it is kind of hard to justify buying ONE chair that costs over $100 and upwards into the $1000s. But oh the sweet joy of finding one for the right price! You will be mine..oh yes...you will be mine. So since Morgan made some sweet moolah at the Vintage Bazaar, he is kindly and husbandly buying one for me. And here it is...I can't wait to have you...and you'll be mine all mine! Heck, at this price anyone can buy one.

Monday, August 16, 2010

How To Find the Best Vintage

If you're like me, you love vintage to keep and sell. As a seller, you can't just go to the local Salvation Army and expect to find the most amazing piece of vintage...though its not impossible. There are a few places you can find great vintage:
1. Garage sales - find some gems the owners don't realize the worth of
2. Thrift shops - some unique but often broken/ poor condition items
3. Antique / vintage shops - good finds but very pricey
4. Estate Sales. - THE place to go

Estate Sales are the cream of the crop when it comes to the best vintage finds. Yes, its a bit morbid, kinda sad and makes you really think about you're own mortality but might as well reap some benefits, right? Here you can find items the previous owner cherished and kept in pristine condition. Entire sets of dishes, pyrex, barware, you name it.
You can find unique, one of a kind items, old toys, all kinds of awesome gems. And in turn, make a profit or keep for your own use. Personally I love keeping vintage for these reasons: Most are made in America (a rare thing these days), made to last (even rarer), and have great designs you just don't see anymore.

Friday, August 13, 2010

Craft Room: Before and After

I said I was going to make a project out of my craft/sewing room and I sorta did. I didn't get to paint it but honestly, I just needed to get my little sanctuary up and running. It was cluttered and not even close to being organized but I just locked myself in there and got to work. This is what it looked like before:
As you can see - just a  huddled mass of stuff. Some stuff didn't belong in here so my room was becoming a catch-all. I had to put a stop to that (even though I was a contributor ). So here is the room now...

Sewing a shirt, presently

Some supplies as well as my daughters' old dresser to hold my vast amount of fabric and yarn
More stuff to keep me somewhat organized.

So there it is. Im finally being more productive these days... though it has been tougher to do much with 3 kids. The newborn is not even the hinder-er; its my 2 year old Lucy. That kid is a wrecking ball I tell you what. Look at that face...you know she's about to do something sinister... 

Saturday, December 12, 2009

How To: Glittery Owl Hair Clip Holder

My daughter has a bunch of hair clips that always end up lost since there is no good place for her to store them. I had the idea of making her a cute clip holder out of my glitter vinyl and thought I'd git'r done since X-mas is fast approaching and time is running out. SO ...If you have any girls to make gifts for this Christmas, here is a fun one! This takes about 20 minutes AND no sewing is required!

FIRST, you will need your tools:
  • The owl template, all cut out (its best to print it on card stock!)
  • Scissors (good sharp ones)
  • Hot glue gun (low heat is what I use)
  • Glitter Vinyl
  • Spool of ribbon
Now, turn the vinyl to the backside and trace all the pieces on the color you're using for each body part. Cut each one out.

Once you have all your pieces cut out, arrange them however you like. I added a few more things that are not in the template - the scalloped 'feathers' on the belly and 2 more medium sized circles to add on the eyes. Of course you can add whatever other embellishments you like.

Carefully take your hot glue gun - make sure its plugged in ;) and glue the face on first, then 'feathers' if you make them, then wings last. Take about 2 feet of ribbon, cut it in half, flip the owl over (once glue dries) and glue the ribbon to the back and take another 4" of ribbon, make a loop and hot glue it to the back of the top so you have a way to hang it up. Done!

Now to wrap it up or hang and put it to some use!

Thursday, December 10, 2009

Family Trees: The Many Options!

Creating family trees can be a daunting task, especially for me, who has 16 people on my immediate side alone - that's just parents, siblings and kids..then adding my husbands side is easy since its just 5. But hope exists! Its how creative you can get with it. Here are some great ideas I found around the interwebs that look WAY better than those cheesy ones they had you make in school.
I particularly love this Balloon Family tree - well, I guess its not really a tree, but you get the idea. Its fun for a kids room..or any really. but I'm sure mine would want it in their room. I love that its in a shodow box, which makes it easy to add new additions to the family... we have those a lot!

This literal tree is a bit more sophisticated and grown up. Its great if you have a big family or include more than just immediate members. Its a bit of trickery too since at first glance you probably would not notice what it is exactly until you got up close and personal.

Here is another fun one; simple, geometric, colorful. Great for small-ish families or just condensing yours.
Here is a clever tree that has pics of family members - visualizations are always great. This would be a fun one that you and your little one(s) can do together.

Well, I hope to delve into some Family Tree fun now that I have some inspiration!

Thursday, November 19, 2009

Free Printable Advent Calendar from MIBO


Hey, need a sweet DIY advent calendar right now? For free? Just email Mibo at info@mibo.co.uk and they'll send one your way. They have a link to download it, but it isnt working very well so they suggest emailing them. The calendar takes about 5-15 mins to make - all you need is a ruler, a craft knife and a gluestick...oh and obviously a printer. Full instructions are included. How nice of them!

Sunday, April 5, 2009

Before & After: Making the boring UNboring

AS hard of a time I give IKEA, I do love the place and what I as a crafter like the most is how plain and simple their items can be - its makes an easy instant canvas for creativity.

Take these glass air-tight food storage jars. I got them for the many flours I use; bread, wheat, all-purpose. The only thing was how do I distinguish them from each other? Well, I had some left over Rub-ON Letters from Maddy's party favor coloring books and decided I'd use them - they were fun and colorful!
I rubbed each letter on, making sure I wasnt spelling the words wrong like "Beard Flour" or something. After all that, I sealed them with some sealer to waterproof it. Doing this is better than just using a sticker that would be ruined by water and my hands (covered in cooking oil, or whathaveyou) , or printing out a clever label and taping it to it...lame. Plus this has a very clean, seamless look. I was very pleased with the outcome of this idea and now search for cool rub-ons to put on our vast amount of glass jars I store our other dry goods in.

Thursday, February 12, 2009

A good reason to go Thriftin

If I had a dream job, it would be to shop at thrift stores all day for cool unique finds. Just the other day - when it was unseasonably nice out - we went over to a little second hand shop we like to frequent. I love the basement, its the place to find lots of fun vintage stuff. As I approached the top of the steps, be still my heart there it was - at the bottom of the stairs just waiting for someone to clean him up and take him home - my Chair. Not just a simple chair, but those desk chairs where the little table flips up. Now I'll have a place to write my hate mail to Wal-Mart. He was so dirty with God knows what caked on him, just a good cleaning revealed the vibrant shade of my favorite color blue. He's one of them fiberglass chairs with a metal base and legs. I think he was once property a bowling alley because 'Brunswick' is marked on the back. Ive actually been searching Craigslist for this kind of chair for months, all I found were ones for $75 to $100 EACH! I'm glad I waited cuz this sweet thang was only 5 bucks. Now if I wanted to - I could turn around and sell it for 20 times more, but im content in getting what Ive wanted...only when Im in dire straits will I let him go.

Monday, December 8, 2008

Ultimate Handmade Holidays Tutorial List


Need some good handmade gift ideas? Not only that, but to make them yourself? I love the Sew Mama Sew blog and if you never heard of it, make sure to become very familiar with it - its amazing. They have the ultimate handmade holidays list of tutorials the likes ye have never seen! Some examples above!

Wednesday, December 3, 2008

DIY: Wall Decals

I was just thinking about wall decor when it dawned on me that you can create your own wall decals for the cost of one roll of CONTACT PAPER! You can get it in so many colors and faux textures. I got some vintage gold and yellow damask contact paper from an estate sale so I figured I'd give it a whirl. Heres all you do:

1. Draw out or trace your design. Silhouette's are the easiest! (One cute example is make sihouettes of your kids and put them up in their rooms.) but go for as complex as your able.

2. Roll out enough contact paper to fit your needs and draw or trace your design on the back side with a permanent marker. Remember it will be a mirrored image when your done, so numbers and letters will have to be drawn backwards.

3.When finished drawing it out, use an x-acto knife to cut out your design as neatly and crisply as you can.

4. Make sure all lines, curves and corners of the image are completely cut thru, and cut/pull of any excess paper clining to your image.

5. Wipe down the wall (or place your putting it) and let it dry completely.

6. Remove the paper backing and stick the design to desired surface. Smooth it out as needed.

7.Finito!

This is a really neat and easy DIY project that you can do to cover and / or decorate all bare or ugly surfaces! Walls, file cabinets, boxes, desks, mirrors, doors, shelves, and the list goes on.

Wednesday, August 20, 2008

Deerly Beloved...


I was going through scores of wall art / decals on etsy and the web. I came upon Wallcandy and I must say they have some sickly sweet stuff, but its still really fun. Their prices are not to bad either, considering the size and intricacy of this particular decal kit which contains 1 pink deer & 1 blue deer (21½x14”), 18 flowers, 6 hearts, 9 mushrooms and 12 candies all for a grand total of $50.


Tuesday, August 12, 2008

UPDATE: So far so good

This is what I finished so far. Yesterday I totally messed up! I pinned and sewed the other cushion to finally see that I sewed the wrong side to the right side....UGH! Moron! I cant believe I was so inattentive of what I was doing...though I do that all the time, honestly. So I'll get that done today. Now the last thing is sewing the body together and hope it fits on at least semi-perfectly. Here's a close up of the fabric. Its actually out-door furniture fabric, but so easy to clean when you have messy children!


Friday, August 8, 2008

CURRENTLY: Upholstering my couch


We..or more like I am in the process of re-upholstering our couch. Quite the big job. Its even bigger when you have a toddler and a newborn to tend to...but I am determined to finish it this weekend!

Anyway, our couch was from IKEA, so its super easy to redo with its simple pattern. I don't know what the couch is called, but I dont think they make it anymore -a shame, really. But I'm sure it was something like MERVDDORKK - they have to crazy names to them. 
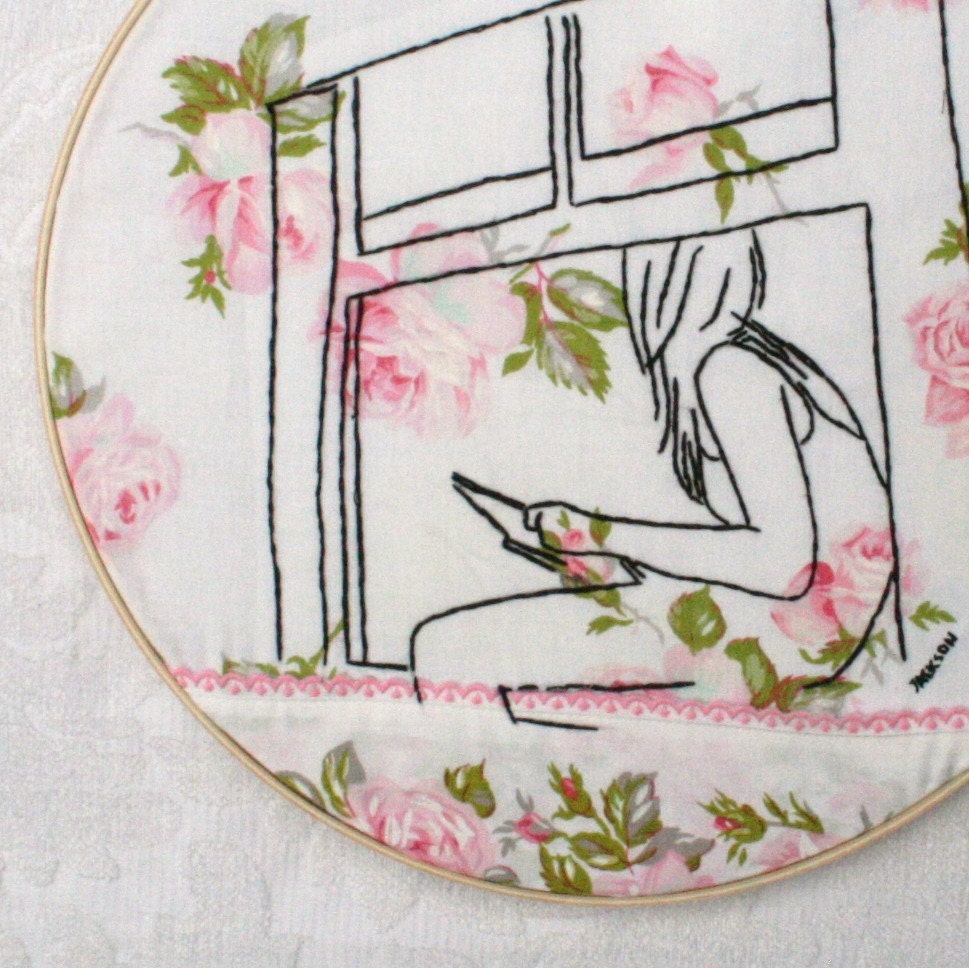
There's a picture of what it looks like, complete with Maddy watching PeeWee's Big Adventure. It was T-RASHED from our negligence and abuse -and food...and kids played a huge part.. It doenst look as trashed as it really was...plus I accidentally left a black permanent marker on it and it bled all over.

Anyway, I found this really cool cream/gray small damask print fabric for $4 a yard on clearance so I held my breath, bought the whole bolt, and prayed it was enough. it was about 9 yards total and I'll admit - its not enough. Luckily, I can be resourceful...and sly like a fox!

This is what we did - and you can too if you have a simple IKEA couch that has a washable cover - meaning it can easily come off.


You will need:


  • enough yards of fabric - measuring EVERYTHING helps determine that

  • sharp scissors

  • heavy duty upholstery thread - 3 spools of a matching color to be safe!

  • Heavy duty needles -size 16 -18 depending on the thickness of the fabric

  • a washable marker

  • a sewing machine

  • pins

  • patience!!!

  1. We took all the covers off the cushions, pillows, and the body.

  2. mark each piece like "back", "bottom" , "Pillow", etc with a marker (you'll see why)

  3. grab a trusty seam-ripper and tear the seam of each item at a time. if there are doubles of the same item - like pillows and cushions, do just one of each and keep the others in tact as a guide

  4. Name each piece of each item - like "gusset", "left top arm rest", "right bottom arm" - do it so you understand what your talking about

  5. pile each separate item together so they dont get mixed up with the other stuff

  6. now the fun begins - and this is just how we do it.

  7. lay the good new fabric face down on the floor or an extremely LARGE cutting surface

  8. lets say you want to start with a cushion

  9. Lay the cushion pieces face down as well - keep in mind which way the pattern of your new fabric is facing. Its its striped, for instance, you dont want one cushion's stripes being horizontal and the other vertical

  10. take your marker and trace the pieces, making sure to mark on the traced one what piece it is. do all

  11. cut out each piece. Take the cushion that's still intact as a guide and see how much of a seam allowance it has. If they have a zipper, keep those zippers!!

  12. Sew the item just as you see it in its counterpart

  13. Repeat for all items that have counterparts

  14. Piece together the body - don't pin yet.

  15. Sew each item one at a time to the body till you're done

  16. Say a silent prayer

  17. slip cover on

  18. place one pillows and cushions

  19. sit and enjoy

  20. bask in the satisfaction that you didn't pay $250 for a custom cover or even more for a new couch!

yes, this is not a professional way to go about it, but so far its working - if I finish and find that I totally blew it and wasted all that time and a whopping $40, i'll kick myself. BUT if it turns out right, I will reveling with step #20.

Twitter Delicious Facebook Digg Stumbleupon Favorites More