 |
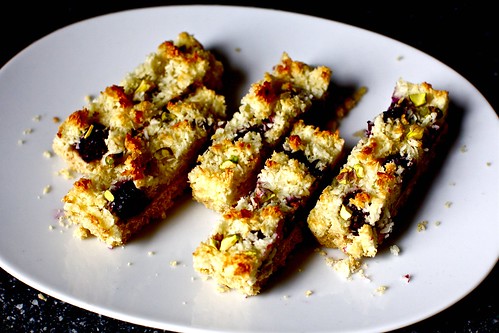
| Image via Smitten Kitchen |

A string of thoughts, DIY, thrift scores, geeking out, sewing, crafting, and so on....

A string of thoughts, DIY, thrift scores, geeking out, sewing, crafting, and so on...
A string of thoughts, DIY, thrift scores, geeking out, sewing, crafting, and so on...
A string of thoughts, DIY, thrift scores, geeking out, sewing, crafting, and so on...
A string of thoughts, DIY, thrift scores, geeking out, sewing, crafting, and so on...
|
| Image via Smitten Kitchen |


 It could may well have been that the coffee is just great old or fresh but I highly HIGHLY recommend Great Lakes Coffee - I especially enjoyed the Organic Triple Threat, its awesome!
 I was really stressed watching 3 kids today...2 being mine and the other my nephew. They're fine until all are screaming and crying at the same time. I was like "serenity NOW!" So once I got them down for naps and pacified, I decided to indulge myself in my favorite coffee drink. Its like a mocha frappaccino- but home made, not one of those rediculous $4 sucker traps.
1. Drink Mixer - the kind to make hard drinks, martinis and such
2. Brewed Coffee - I use the whole foods 360 French Roast and grind that up. We only have a 4 cup pot, so i grind 6 tbs of beans
3. 2 tbs. Creamer - not skim or even 2%, it has to be half and half!
4. Ice - about 6 large cubes
5. 1 tbs. Chocolate Syrup - I love Trader Joe's Midnight Moo
6. 2 tbs of Sugar (or agave nectar)
Now I take the drink mixer and add the ice, creamer, sugar, and chocolate. Then I add about 2 cups worth of coffee, close the shaker tightly, shake for a good 20 -30 seconds, or at least till the shaker feels really cold in your hands. Open, taste it so its to your liking, if not, add what you think it needs more of. Pour into a glass (with or without ice in it) and Enjoy!

Buttons are great for many things; closing items, embellishments, and so on. Who knew you could eat them too! I found the recipe posted by Minzimiu on Flickr and they seem like lots of fun to make and eat. Just to save time, here's the recipe:
RECIPE
2cups sifted all - purpose flour,plus more for work surface
1/4 teaspoon salt
1/2 teaspoon baking powder
1/2 cup(1 stick)unsalted butter, softened
1 cup granulated sugar
1 large egg
1 teaspoon pure vanilla extract
Gel - paste food coloring in pink and green
Sanding sugar, for sprinkling
1. Whisk together flour , salt, and baking powder in a large bowl; set aside.Put butter and granulated sugar into the bowl of an electric mixer fitted with the paddle attachment; mix on medium speed until pale and fluffy.Mix in egg and vanilla.Reduce speed to low. Add flour mixture; mix until combined. Divide dough into thirds. Knead pink food coloring into 1 piece and green into another. Shape all 3 pieces into disks. Wrap disks in plastic wrap, and refrigerate until firm, at least 1 hour.
2. Preheat oven to 325 . Remove 1 disk from refrigerator; let stand at room temperature until slightly soft, 5 to 10 minutes. Roll out dough on a piece of lightly floured parchment to a 1/8 - inch thickness, dusting with flour as needed. Cut out circles with a 1 3/4 inch round cutter, then lightly press with a 1 1/2 inch round cutter. Make button holes with a skewer. Reroll scraps, and cut.(If dough becomes too soft,refrigerate 10 minutes) Repeat with remaining dough. Space 1 1/2 inches apart on baking sheets lined with parchment paper. Sprinkle with sanding sugar.
3. Bake, rotating halfway through, until edges are golden, 16 to 18 minutes. Transfer to wire racks; let cool completely. Cookies can be stored in airtight containers at room temperature up to 1 week.
4. When you are done do not forget to invite me some! hehe...ok guys...that is it. Hope you enjoy it ..now i need to get some OJ(orange juice) hugs:) ![]()
*3 1/2 cups rolled oats
*1 cup organic flour
*1 cup crisp rice cereal
*1 tsp vanilla extract
*1 cup butter, melted
*1 cup honey
* 1/3 cup packed brown sugar
*2 cups of assorted additives (mini chips, nuts, seeds, raisins, dried fruit, etc)
First, Put all these dry ingredients (flour, oats,cereal, brown sugar, baking soda) together and mix well. Heat the butter so its half melted with solids - wisk the butter so its creamy looking. Add vanilla to the butter. Stir. Add butter and honey to dry ingredients, mix well. Make sure the heat from the butter didnt heat up the mixture because if you try to add chocolate chips or anything like that, they'll melt. I used 2 cups TOTAL of a mix of mini semi-sweet chips, salted sunflower seeds, crushed peanuts, and raisins. You can add whatever you want, just make sure the amount totals 2 cups - not 2 cups of each. Mix well. Now, put granola mixture in the 9 x 13 pan, smooth over with rubber spatula and press HARD. I took a peice of wax paper, placed it over the granola in the pan and packed it down very firmly. Now refridgerate for about an hour - this will keep it from being too crumbly. When ready, preheat oven to 325, then place bars in for 18-20 minutes. Take out and let cool for 15 mins before cutting. They're heavenly! Store in an air-tight container in the fridge so they hold their shape, or just leave them out if you dont mind a little mess.


