Welcome to the blog

A string of thoughts, DIY, thrift scores, geeking out, sewing, crafting, and so on....

Welcome to the blog

A string of thoughts, DIY, thrift scores, geeking out, sewing, crafting, and so on...

Welcome to the blog

A string of thoughts, DIY, thrift scores, geeking out, sewing, crafting, and so on...

Welcome to the blog

A string of thoughts, DIY, thrift scores, geeking out, sewing, crafting, and so on...

Welcome to the blog

A string of thoughts, DIY, thrift scores, geeking out, sewing, crafting, and so on...

Monday, January 31, 2011

Make This a CRAFTY Blizzard

Its winter and there is not much to do so why not get some crafty stuff done. The blizzard is supposed to hit any day now so its time to finish that project that you've been dreading going back to OR try something new....like one -or all- of these 12 FREE purse patterns.

Penelope tote by Melissa Esplin
Twenty minute totes at The Purl Bee
Roomy pleated handbag at Warehouse Fabrics
Simple purse at Little Girl Pearl
Reversible beach bag by Soozs
Diana hobo bag at Think Liz
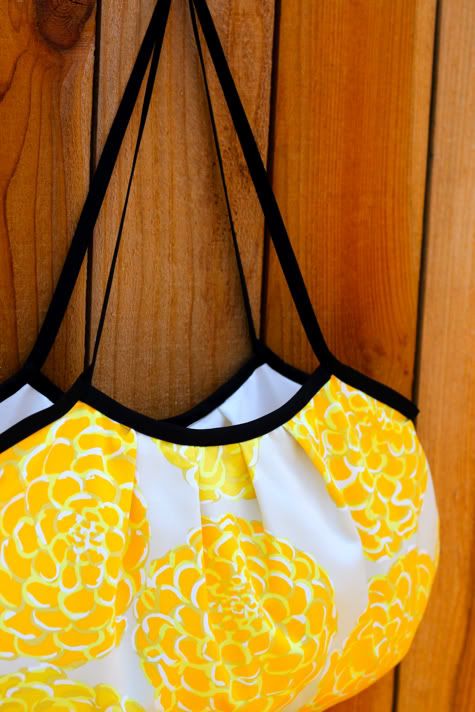
Pleated shoulder bag at Machen Machen
Zippered wristlets by Javajem Knits
Change purse with zipper by Viteen
Recycled grocery totes made from plastic bags at Made
Box pouch with handle by Drago[knit]fly
Lined, zippered pouch at Flossie Teacakes

Don't want to sew?
Then try these Stenciled animal mugs - and you can make them anything - not just livestock, but there are templates for said animals so.....

What you need:
  • Dishware
  • Contact Paper
  • PermEnamel
  • x-acto or craft knife 
  • pencil
  • scissors
  • patience
How to do it:
1. To duplicate these mugs, print and cut out the animal shapes. 
2. Use these templates for Cow, Sheep, and Pig shapes. (or what ever design you feel like)
3. Place each shape atop a small piece of contact paper and outline it in pencil. 
4. Cut out with a craft knife; then discard the paper inside the outline. 
5. Peel away the backing and affix the stencil to a clean, dry mug, making sure to center the image.
6. Following the package directions, use a soft brush to fill in the outline with dishwasher-safe PermEnamel paint ($3.49 for two ounces, joann.com); let set for a few minutes. 
7. Carefully remove the contact paper, clean up any edges with a damp cotton swab, and allow the paint to cure for 10 days.

Fun, aye?

Friday, January 28, 2011

Project Review: City Satchel - Sew What! Bags


Today's Project Review is the City Satchel  found in Sew What! Bags, page 120.

I'll admit, I was a bit intimidated by this project but I found it was very easy despite the skill level being Daredevil. The fabrics I used are white Kona cotton for the lining and black cotton for the gusset. The main fabric I found at IKEA in the as-is section for 90 cents. Its a heavy canvas-like fabric. And there was JUST enough fabric for it too!

I really love the layout and imagery in this book. It made it simple enough visually that I didn't really need to read the instructions ( although I don't encourage that! ) I love all the pockets. I love making pockets too - its fun and that equals lots of organizing space in the bag! There are 2 on each side (gusset), 4 on the back and 3 under the flap. I added a few more to the inside as well. Can you really have too many pockets?

Options:
The pattern gives you the option to add a lining or not. I completely recommend adding the lining - it will give you a sturdier bag and a more finished look. You also have the option to add more pockets on the inside lining.

What I would Do Differently:
The pattern calls for a 8x44 piece for the strap, which I found WAY too long and wide for me. I cut mine down to about 38" and I would recommend a 6.5" width.

Overall this was a great pattern that is really fun and quite simple. May be a little hard for a newbie, but you can surely take a courageous crack at it.

Now what do I do with this....?

Sunday, January 23, 2011

50% off Jewelry Sale!


I've decided to stop selling jewelry in my CrankHeartPony Shop. Well, I'm still debating,  to be honest, but I think if I empty it all out, that will help me make a definite decision. So if you are interested in any goods from my Jewelry section, feel free to use the 50% off coupon code "JEWELS50". But ONLY in the Jewelry Section! :)
Enjoy!


Friday, January 21, 2011

Project Review - Online Edition: Bias Tape Bag @ Prudent Baby


Yes, it is a fact that I hate bias tape. Maybe even fear it - for it has jacked up so many potentially great projects for me. But in reality, who am I kidding - it's all me! I jack them up...usually in my anger over how much the bias tape aggravates me.

So, I've decided its time to conquer this devil and fear no more! I've always wanted to make a bias tape bag and I'll no longer let my fears and anger get in the way.

Over at Prudent Baby - I love this site, btw - They have a pattern for said bag and dagnabbit, I did it!

I would have finished sooner  - much sooner (the project states it should be an under-an-hour project). I like to multitask when I sew, and yes, watching tv is considered a task...and AMC was having a marathon of The Walking Dead so needless to say I was a bit distracted.. and it took about 4 hours.

So on to the review:
I used the only double folded bias tape I had. And it was tan. Hmph. The only fabric I had that would match was this lovely one - Freshcut by Heather Bailey. For the lining I used Objects of Desire by Sandy Gervais. What's cool is its reversible. I like that. The pattern was very clear and used lots of step-by-step pictures (I LOVE that!). The only thing I got a bit stuck on was how to sew the bias once you got to the "V" shape on the outer edges of the bag and how to 'finish' once the 2 ends other bias tape meet. I like how they pinned the fabric together with the pin ends facing out instead of in, the latter being seen most in sewing books and tutorials. This made sewing much easier and less stop-and-start. Also, they have a different take on sewing bias than what I've ever seen, and it was a breath of fresh air. Its very easy to make this bag and I recommend it to all skill levels.

Overall, I like it, bias no longer is my enemy and it got a pretty sweet bag out of it. Hooray.

Monday, January 17, 2011

Project Review: Online Edition

I've decided, with all the great tutorials out there on the interwebz, I should try tackling a few of them. So I will. First up: Bias Tape bag at Prudent Baby. In this one, I'm hoping to overcome my hatred of bias tape.

Best Tools for Cleaning Vintage


For all the years I've been buying vintage, there has been one thing plaguing me; how to get it clean, where its good-as-new looking. For many years, it just took the right cleaners and a good amount of elbow grease. Now we have something magical. Magical, indeed.

Magic erasers are excellent for cleaning vinyl furniture. Nothing will work better. Nothing! Its great on fiberglass, wood, metal, etc. Anything with nooks and crannies of a very small nature. Once, Morgan was selling this pair of vinyl chars he picked up and nothing would get them clean. Rags and sponges just cannot match the work ethic of the magic eraser. I got a few from the store and it cleaned them up good! and no real 'scrubbing' was involved.  I should warn against using said erasers on certain things, as they will not clean, but ruin them: CD's, DVD's,  and it will scratch/scuff vintage plastic/acrylic items. You're best off with soapy water and/or  a soft cloth with those.

You know what else is great? Steel wool.

I found this adorable tea pot..but inside was grossly tea stained for who knows how long. All that I tried did not work...til one day when I found some steel wool lying around and decided, if I could be gentle, I'd try it. Lo' and behold it worked like magic! It got it to shine like new! Just look at that......amazing.

Now, of course, you can't use steel wool on just ANYTHING because it can take off more than you want in some cases. Even on some metal items, you must be careful. I'd google the best way to clean a certain item if you're not sure.

Ok, last little miracle worker is vinegar. I found these adorable Melmac cups, but the insides were coffee stained - or at least I hope it was coffee. I read online that soaking them in vinegar water overnight helped and it totally works. I used a 80% vinegar to a 20% water solution for very tough stains.

I hope this helps out someone out there. I know it took me long enough to discover a few simple cleaning tips!

Thursday, January 13, 2011

Project Review: Piped Pillow


Project Review: Piped Pillow - S.E.W. Sew Everything Workshop, Page 190.

Let me first say that this book is a complete step-by-step beginners guide as it states in its subtitle. The book starts with sewing tips & tricks for certain fabrics, patterns, materials, supplies - everything. It has some great resources for the sewing novice and intermediate seamstresses. 

I've needed to make new pillows for a while. I've wanted to try this piped pillow because I wanted a bit of a challenge and since I've only used piping once, years ago, I thought it'd be a good time to give it a whirl.

I used some more of the Brother and Sister Design Studio Fabric from Hobby Lobby - and only needed a half yard. I used some black 1/2" piping I found for 25 cents at the 2nd hand shop so the whole project was less than $3! (I already had the pillow form.)

I like the layout of the instructions. The skill level is 3 spools (how clever) - which is intermediate/advanced. Shown are step-by-step imagery, finished product and very clear instructions. It also states the pages where you can find how to do certain techniques like how to notch  corners. I wish all books had these little references so you don't have to search all over for them.


What I would do different:
I'll admit, the hardest part was getting the pillow form into the 7" opening. Next time I'd add a zipper to create pillow cover than can be taken off and washed - I do have kids that like to throw pillows on the floor and stand on them - so odd. Maybe we should get some carpeting since all this pillow standing has become a problem.

Overall, it was a very fun & easy pattern - even with the "3 spools" skill level. I didn't think it was hard at all. I would recommend this whole book to all skill levels. You get patterns for some cute clothes, outerwear and under, bags, accessories and home decor. If you want to learn how to create some clothing (for men and women), this would be a great first-timer's guide.

Wednesday, January 12, 2011

Organizing Chaos

 For the whole time I've been sewing (about 4 years), all the patterns I've bought, downloaded, created - have all ended up in my "Patterns" binders. At this point in time, it was just a chaotic mess of papers and cut-outs.


Forget about finding anything. It was somewhat in order, but the worst part was lugging it around, having papers spill out, then patterns get mixed up - or ripped up by these children. I decided it was time to do something about it.

So I took a file that I used for sorting different types of papers, condensed those cuz I care not for papers anymore, took the file headers (that came with the file, never used, thankfully) and stamped the file names on them.

Now  Everything is in its place. I clipped all small pieces for patterns, instructions, and all that so I know what goes with what. It took a while to get it all sorted out, but I did find a bunch of patterns for many things I used to make and totally forgot about - outta sight, outta mind sorta thing. I'll be happy to start making those again!

You can find the file box at Target for about $10 or less. Maybe not this same one since I got it about 2 years ago, but I'm sure they've got cuter ones now. Organize anything and everything with it; recipes, documents, wedding stuff, whatever it is that adds cluttered chaos.

Tuesday, January 11, 2011

Project Review: Oven Mitt & Hot Pads

Project Review: Oven Mitt & Hot Pads - One Yard Wonders, page 62.


Alright! Another one from One Yard Wonders! You know what I love about this book besides its multitude of great projects? The fabric choices! Honestly, if the fabric choices are lame or ugly, I'd never buy the book, I don't care HOW cool the patterns are! I may be shallow, but fabrics inspire me. :)

Anyway, back to the review...

Ok, so this one took a bit more time than the last one, but with good reason; you have a bit of quilting to do. I went to Hobby Lobby and got this super cute fabric from Brother and Sister Design Studio (they have quite a fabulous line and perfectly priced too at 4.89 a yard - on sale, but its ALWAYS on sale).  I just burnt my last pair of hot pads on the stove top (no clue how, either - its an electric range with safety settings) so this was another project used to create something I needed.

The instructions were great - very informative and easy to understand. There are quite a few steps, but all are handled as if they had me in mind...very easy to understand.

What I did different:
I quilted with invisible thread. I hate trying to coordinate my thread with fabrics so I go for no color at all. I didn't use bias tape on the hot pads either - bias tape is the bane of my existence. So instead of leaving raw edges, I sewn the holders RST, stitched around and turned right-side out, then used fabric glue to close the opening. I think its good for learning sewers to know that you can always change up a pattern to fit your comfort level. I am not comfortable with bias tape. I know how to use it, I just hate to.

What  I'd recommend: 
Quilt ALL your fabric before cutting any of your pieces out. It says to do this just for the mitt, but do it for all and it'll save you more time and annoyance. Believe me! Also, if your machine has a "darn" switch, use it. It makes the quilting go much smoother and you can have better control of  the design you make.

Overall, it was a great pattern and lots of fun to do. I'd recommend it to all skill levels... though the newbies should watch out for that bias tape!

Here they are and all their glory in my kitchen, ready to protect me from myself.

Saturday, January 8, 2011

Project Review: Ironing Board Cover

First project review down, who knows how many to go - I haven't counted but I will be doing a few from each book.
This time around I did the Tabletop Ironing Board Cover from One-Yard Wonders, page 54.
I sorely needed to make one for my sad, scuzzy looking ironing board that has sticky residue from my absent-minded ironing of fusible interfacing onto it on more than one occasion.Gross, isn't it?

SO- to the review!
I used flannel for the cover. The flannel is baby blue and brown polka dots and is from the JoAnn Fabrics line.  Why flannel? Why not! I like the soft feel and it was the only thing I had available to me at the time. I'll admit, the only other piece that fit the size was this really pretty Amy Butler fabric I had. But, I suppose the ironing board wasn't worthy of it :)
OK - now the instructions are clear but I would prefer some step-by-step imagery. I learn by seeing; reading about it alone doesn't help my mind comprehend what I'm supposed to be doing. But that's just me.  They didn't note a skill level - but maybe that's so the project doesn't scare anyone away.
I changed a few things from it as well. I didn't make the paper template they suggested, I just used a fabric marker (disappearing ink one) traced around the fabric using the board itself and cut like so:

I also did not use cording or a cord lock (like the things you see at the ends of your hoodie to tighten your hood around your face and make it stay that way). Instead, I threaded some 1/4" elastic in the casing, pulled it taught and tied & sewn the ends.
Overall, it was very simple and fun to make and only took about 45 minutes all together. I like how it turned out. I would recommend this to someone with sewing experience and one starting out as I think it's simple enough.
Now, that is MUCH better!

NEXT UP: Quilted Pot Holders

Thursday, January 6, 2011

New to the CrankHeartPony Shop

Lots of new items added and more to come!

Wednesday, January 5, 2011

Books: Pattern Reviews

I have a love for 2 things; Sewing and Books. My favorite thing is when they come together to create my ultimate favorite thing; a sewing book full of fun patterns. I have numerous crafty sewing books and not all are put to as good of use as I intended when I got them. So here comes the challenge: I will pick one pattern - or maybe a few - from all the books I have yet to make something from. I think all this time I just liked to look at all the fun projects, yet never decided on a fabric to create them - I get very picky about using certain fabrics - like the project has to be worthy enough for me to use it...like my Echino fabric I hold so dear. And God forbid I screw it up and waste the precious fabric. God. Forbid.

 I will be using the following books for this Pattern Review:
I'll be looking at the following:
1. What book,  pattern and the page its on.
2. What fabrics I have chosen - designers, colorways - if available. I do have a boat load of vintage fabrics Morgan gave me that I may use, but we'll see.
3. Clarity of instructions and imagery.
4. Easy/ Difficulty of the pattern (usually stated in the book).
5. Was it fun to make.
6. How do I like the finished product since it can be hard to tell from just the pictures.
7. Whether  I'd  recommend the pattern/book to a beginner or one who wants to sharpen their sewing skills.

I'm excited to do this - it will give me a reason to sew and learn a few new things. I hope to sew some clothing from a few of them too! I have that dress form my husband got me 2 Christmases ago - I should probably use that since he keeps making me feel guilty for not.

I'll get cracking on this asap!

Monday, January 3, 2011

Happy 2011!

I hope all had a safe and happy Holiday & New Years. Traditionally, we go bowling with my family on New Years Eve but this time Levi was cutting 4 teeth and was a feverish little mess. Poor kid. We spent NYE at home with friends and playing GTA4. I'm terrible at it because I have a hard time finagling all them controls. I'll take on anyone and win on old school Nintendo, though.

Twitter Delicious Facebook Digg Stumbleupon Favorites More